In my article My semi automated workflow for blogging, I have talked about my blogging workflow. There were two main things (actually one thing) in that flow that were not automated. i.e., automatically Uploading to Blogger and automatically Uploading to Medium. I have talked about the first one here. This article is about uploading posts to Medium automatically.
Developer documentation for Medium is a breath of fresh air after the mess that is Google API’s. Of course, Google API’s are complex because they have so many different services, but they could’ve done a better job at organizing all that stuff. Anyway, Let’s see how you can use Medium API’s.
Setting Up
We don’t really need any specific dependencies for what we’re doing in this article. You can do everything with urllib which is already part of the python standard library. I’ll be using requests as well to make it a bit more simpler but you can achieve the same without it.
Getting the access token
To authenticate yourself with Medium, you need to get an access token that you’ll pass along to every request. There are two ways to get that token.
- Browser-based authentication
- Self-issues access tokens
Which one you should go with, depends on what kind of application you’re trying to build. As you can probably guess based on the title, we’ll be covering the second method in this article. The first method needs an authentication server setup which can accept callback from Medium. But, since at this moment, I don’t have that setup, I’m going with the second option.
The Self-issued access tokens method is quite easy to work with as you directly take the access token without having to have the user authenticate via the browser.
To get the access token, Go to Profile Settings and scroll down till you see Integration tokens section.
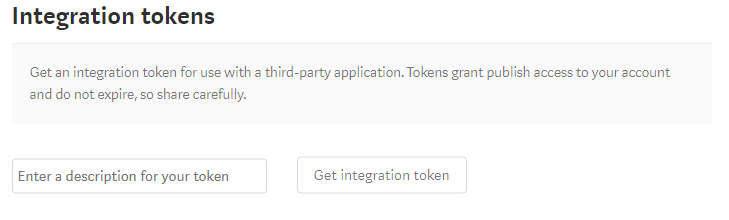
There enter some description for what you’re going to use this token and click on Get integration token. Copy that generated token which looks something like 181d415f34379af07b2c11d144dfbe35d and save it some where to be used in your program.
Using Access token to access Medium
Once you have the access token, you’ll use that token as your password and send it along with every request to get the required data.
Let’s get started then. As, I’ve said we’ll be using requests library for url connections. We’ll also be using the json libary for parsing the responses. So, Let’s import them.
import requests
import json
Then use access_token you’ve got and put it in a headers dictionary.
access_token = '181d415f34379af07b2c11d144dfbe35d'
headers = {
    'Authorization': "Bearer " + access_token,
    'User-Agent': 'Mozilla/5.0 (Windows NT 6.3; Win64; x64) AppleWebKit/537.36 (KHTML, like Gecko) Chrome/63.0.3239.84 Safari/537.36'
}
The User-Agent in the above dictionary is required as Medium won’t accept your request otherwise. You don’t have to have the same value as I did.
Validating the access token
First thing to check is if the access_token is valid. You can do that by making a GET request to https://api.medium.com/v1/me and checking the response.
me_url = base_url + 'me'
me_req = ureq.Request(me_url, headers=headers)
me_response = ureq.urlopen(me_req).read()
json_me_response = json.loads(me_response)
print(json_me_response)
And, when I print the json_me_response, which is a json object, I get the following:
{
"data": {
  "id":"5303d74c64f66366f00cb9b2a94f3251bf5adskak7623as",
  "username":"durgaswaroop",
  "name":"Durga swaroop Perla",
  "url":"https://medium.com/@durgaswaroop",
  "imageUrl":"https://cdn-images-1.medium.com/fit/c/400/400/0*qVDXEHT9DDYUOcrj."
  }
}
If we got that response like above, then we know that the access token we have is valid.
From there, I extract, the user_id from the JSON string, with
user_id = json_me_response['data']['id']
Get User’s Publications
From the above request, we’ve validated that the access token is correct and we also have got the user_id. Using that we can get access to the publications of a user. For that, we’ve to make a GET to https://api.medium.com/v1/users/{{userId}}/publications and you’ll see the list of the publications by that user.
user_url = base_url + 'users/' + user_id
publications_url = user_url + 'publications/'
publications_req = ureq.Request(publications_url, headers=headers)
publications_response = ureq.urlopen(publications_req).read()
print(publications_response)
I don’t have any publications on my medium account, and so I got an empty array as response. But, if you have some publications, the response will be something like this.
{
  "data": [
    {
      "id": "b969ac62a46b",
      "name": "About Medium",
      "description": "What is this thing and how does it work?",
      "url": "https://medium.com/about",
      "imageUrl": "https://cdn-images-1.medium.com/fit/c/200/200/0*ae1jbP_od0W6EulE.jpeg"
    },
    {
      "id": "b45573563f5a",
      "name": "Developers",
      "description": "Medium’s Developer resources",
      "url": "https://medium.com/developers",
      "imageUrl": "https://cdn-images-1.medium.com/fit/c/200/200/1*ccokMT4VXmDDO1EoQQHkzg@2x.png"
    }
  ]
}
Now, one weird thing about Medium’s API is that they don’t have a GET for posts. From the API’s we can get a list of all the publications but you can’t get a user’s posts. You can only publish a new post. Although, it is odd for that to be missing, It is not something I’m looking for anyway, as I am only interested in publishing an article. But if you need that, you probably should check to see if there are any hacky ways of achieving the same (at your own volition).
Create a New Post
To create a new post, we have to make a POST request to https://api.medium.com/v1/users/{{authorId}}/posts. The authorId here would be the same as the userId of the user whose access-token you have.
I’m using requests library for this as making a POST request becomes easy with it. Of course, first you need to create a payload to be uploaded. The payload should look something like the following, as described here
{
  "title": "Liverpool FC",
  "contentFormat": "html",
  "content": "<h1>Liverpool FC</h1><p>You’ll never walk alone.</p>",
  "tags": ["football", "sport", "Liverpool"],
  "publishStatus": "public"
}
So, for this, I did the following:
posts_url = user_url + 'posts/'

payload = {
    'title': 'Medium Test Post',
    'contentFormat': 'markdown',
    'tags': ['medium', 'test', 'python'],
    'publishStatus': 'draft',
    'content': open('7.Test_post.md').read()
}

response = requests.request('POST', posts_url, data=payload, headers=headers)
print(response.text)
As you see, for contentFormat, I’ve set markdown and for content I read it straight from the file. I didn’t want to publish this as it is just a dummy post and so I’ve set the publishStatus to draft. And sure enough, it works as expected and I can see this draft added on my account.
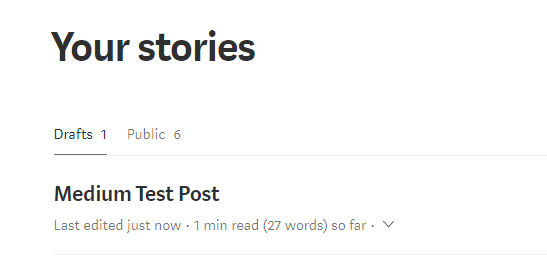
Do note that the title in the payload object won’t actually be the title of the article. If you want to have a title, you add it in the content itself as a <h*> tag.
The full code is available as a gist.
That is all for this article.
For more programming and Python articles, checkout Freblogg and Freblogg/Python
Some articles on automation:
Web Scraping For Beginners with Python
My semi automated workflow for blogging
This is the seventh article as part of my twitter challenge #30DaysOfBlogging. Twenty-three more articles on various topics including but not limited to Java, Git, Vim, Software Development, Python, to come.
If you are interested in this, make sure to follow me on Twitter @durgaswaroop. While you’re at it, Go ahead and subscribe to this blog and my blog on Medium as well.
If you are interested in contributing to any open source projects and haven’t found the right project or if you were unsure on how to begin, I would like to suggest my own project, Delorean which is a Distributed Version control system, built from scratch in scala. You can contribute not only in the form of code, but also with usage documentation and also by identifying any bugs in the functionality.
Thanks for reading. See you again in the next article.