Showing posts with label Programming. Show all posts

January 10, 2018

Json Parsing With Python

18:26 Posted by Freblogg , , , , , No comments

JSON has become an ubiquitous data exchange format everywhere. Pretty much every service has a JSON API. And since it is so popular, most of the programming languages have built-in JSON parsers. And Of course, Python is no exception. In this article, I'll show you how you can parse JSON with Python's json library.

Python Logo

JSON parsing in Python is quite straight forward and easy unlike in some languages, where it is unnecessarily cumbersome. Like everything else in Python, You start by importing the library you want.

import json

In this article, I am going to use the following JSON I got from json.org

{
  "menu": {
    "id": "file",
    "value": "File",
    "popup": {
      "menuitem": [
        {"value": "New", "onclick": "CreateNewDoc()"},
        {"value": "Open", "onclick": "OpenDoc()"},
        {"value": "Close", "onclick": "CloseDoc()"}
      ]
    }
  }
}

We have got a good set of dictionaries and arrays to work with in this data. If you want to follow along, you can use the same JSON or you can use anything else as well.

The first thing to do is to get this json string into a variable.

json_string = """{"menu": {
  "id": "file",
  "value": "File",
  "popup": {
    "menuitem": [
      {"value": "New", "onclick": "CreateNewDoc()"},
      {"value": "Open", "onclick": "OpenDoc()"},
      {"value": "Close", "onclick": "CloseDoc()"}
    ]
  }
}}"""

And now we parse this string into a dictionary object with the help of the json library's loads() method.

json_dict = json.loads(json_string)

And you're done. The JSON is parsed and is stored in the json_dict object. The json_dict here is a python dictionary object. If you want to verify, you can do that by calling the type() on it with

print(type(json_dict))

And it will show that it is <class 'dict'>.

Getting back, We have the entire json object as a dictionary in json_dict object and you can just drill down into the dictionary with the keys. On the top level, We just have one key in the dictionary which is menu. We get can get that by indexing the dictionary with that key.

menu = json_dict['menu']

And of course menu is a dictionary too with the keys id, value, and popup. We can access them and print them as well.

print(menu['id'])            ## => 'file'
print(menu['value'])         ## => 'File'

And then finally we've got popup which is another dictionary as well with the key menuitem which is a list. We can verify this by checking the types of these objects.

popup = menu['popup']
print(type(popup))           ## => <class 'dict'>

menuitem = popup['menuitem']
print(type(menuitem))        ## => <class 'list'>

And Since menuitem is a list, we can iterate on it and print the values.

for item in menuitem:
    print(item)

And the output is

{'value': 'New', 'onclick': 'CreateNewDoc()'}
{'value': 'Open', 'onclick': 'OpenDoc()'}
{'value': 'Close', 'onclick': 'CloseDoc()'}

And of course each of these elements are dictionaries and so you can go further inside and access those keys and values.

For example, If you want to access New from the above output, you can do this:

print(menuitem[0]['value'])  ## => New

And so on and so forth to get any value in the JSON.

And not only that, json library can also accept JSON responses from web services. One cool thing here is that, web server responses are byte strings which means that if you want to use them in your program you'd have convert them to regular strings by using the decode() method. But for json you don't have to do that. You can directly feed in the byte string and it will give you a parsed object. That's pretty cool!

That is all for this article.


For more programming articles, checkout Freblogg Freblogg/Python

Some articles on automation:

Web Scraping For Beginners with Python

My semi automated workflow for blogging

Publish articles to Blogger automatically

Publish articles to Medium automatically


This is the 19th article as part of my twitter challenge #30DaysOfBlogging. Eleven more articles on various topics, including but not limited to, Java, Git, Vim, Software Development, Python, to come.

If you are interested in this, make sure to follow me on Twitter @durgaswaroop. While you're at it, Go ahead and subscribe on medium and my blog as well.


If you are interested in contributing to any open source projects and haven't found the right project or if you were unsure on how to begin, I would like to suggest my own project, Delorean which is a Distributed Version control system, built from scratch in scala. You can contribute not only in the form of code, but also with usage documentation and also by identifying any bugs in its functionality.


Thanks for reading. See you again in the next article.

January 08, 2018

Datasets In Apache Spark - Part 3 | Writing Datasets to Disk

In the last tutorial we've seen how to create parametrized datasets. Once you create datasets and perform some operations on them, you would like to save those results back into storage. This is what we'll try to do in this article - Saving Datasets to storage.

Spark Logo

The first thing we'll do as always is to create the spark-session variable.

// Initialize Sparksession
SparkSession spark = SparkSession.builder().appName("Freblogg-Spark").master("local").getOrCreate();

Using that session variable, we read the fake-people.csv file which has data like this:

id,first_name,last_name,email,gender,ip_address
1,Netti,McKirdy,nmckirdy0@slideshare.net,Female,148.3.248.193
2,Nickey,Curreen,ncurreen1@tripadvisor.com,Male,206.9.48.216
3,Allayne,Chatainier,achatainier2@trellian.com,Male,191.118.4.217
...

We read this file into a dataset as following:

// Read csv file
Dataset<Row> peopleDs = spark.read().option("header", "true").csv("fake-people.csv");

After we have the dataset, Let's assume you've performed some operations on it. Some column selections, some filtering, some sorting etc. And we have a new dataset after all those operations.

// After performing several awesome operations
Dataset<Row> newDs = ....

We want to store this dataset back on the disk. We can do that with the write() on spark session variable, just like read().

newDs.write().csv("processed-data");

The processed-data in the above command is not the name for the output CSV file but instead for the output directory. When you write a Dataset to a file, it will store the data in the format you asked for, CSV in this case, along with adding some check files and status flags as well creating a directory with that name.

These are the files that get created in the processed-data folder.

$ ls ../../apache-spark/processed-data
_SUCCESS  part-00000-311049cf-3e48-4286-b93c-7d2096a18678-c000.csv

There are two more hidden CRC files that I'm not showing here. The part-00000-31hxxxxxxxxx.csv is the actual data file which has the data from the new dataset.

You can also create a json file by running

newDs.write().json("processed-data")

And that will create another folder with json file and the _SUCCESS file inside it.

You can also save this data to an external Database if you want to. You'll use the jdbc() method along with the connection string and the table name. And Spark will write it to the DB.

Parquet Logo

Apart from the CSV and JSON formats, there is one more popular data format in the Data Science and Big Data world. That is Parquet. Parquet is a data format that is highly optimized and well suited for column-wise operations. It is widely used in a lot of projects in the Big Data ecosystem as a data serialization format. And In Spark, Parquet is the default file storage format. Of course one main difference between Parquet and formats like CSV, JSON is that Parquet is not meant to be used for humans. It can only be read by a parquet reader. A sample file looks something like this:

PAR1   �k �>, �          999  1     �5,   �      1   2   3   4   5   6   7   8   9  - 0   1   2   3   4   5   6   7   8   < 2 < 2 < 2 < 2 < 2 < 2 < 2 <
.....

Utterly gibberish. But spark can read and understand it. In fact, As Parquet is designed for speed and throughput, it can be 10-100 times faster than reading/writing from an ordinary data format like CSV or JSON, depending on the type of data.

You save dataset to Parquet as follows:

newDs.write().parquet("processed");

And this will save the dataset as a parquet file along with the _SUCCESS status file.

That is all for this article.


For more programming articles, checkout Freblogg, Freblogg/Java, Freblogg/Spark

Articles on Apache Spark:

Map Vs Flat map

Spark Word count with Java

Datasets in Spark | Part I

Datasets in Spark | Part II


This is the 17th article as part of my twitter challenge #30DaysOfBlogging. Thirteen more articles on various topics, including but not limited to, Java, Git, Vim, Software Development, Python, to come.

If you are interested in this, make sure to follow me on Twitter @durgaswaroop. While you're at it, Go ahead and subscribe here on medium and my other blog as well.


If you are interested in contributing to any open source projects and haven't found the right project or if you were unsure on how to begin, I would like to suggest my own project, Delorean which is a Distributed Version control system, built from scratch in scala. You can contribute not only in the form of code, but also with usage documentation and also by identifying any bugs in its functionality.


Thanks for reading. See you again in the next article.

January 06, 2018

Remove Duplicate Elements From An Array

18:05 Posted by Freblogg , , , No comments

Interviews are a great place to learn about your strengths and weaknesses, which makes them a great way to improve oneself. In one of my interviews, I was asked to Remove duplicate elements from an array. So, given the array a as below, I've to produce b.

a = {1, -2, 3, 1, 0, 9, 5, 6, 4, 5, 3, 1, 0}
b = {1, -2, 3, 0, 9, 5, 6, 4}

Here b has the same order of elements as a but per the problem statement, It is not necessary to do that.

I was flustered for a bit after getting the question. It took me a while to get to a proper solution, not before getting my first solution rejected for using HashMap which apparently, I was not supposed to. I am attributing this mainly to the fact that I was told to write Java code on a piece of paper and not an IDE. Anyway, I came home after that and decided to try it out and find what other's have done online. That is what this article is about.

Array of Donuts

Since that particular interview was in Java, It is only fair that I use Java for the solution here, although I really wanted to do it in Python. Maybe some other time.

Approaches for solving the problem:

Approach #1

The most naive approach would be to just look through the entire array and compare each element to every other element to see if there's a duplicate. Of course, this is useless as its time complexity is O(n^2). So, Let's skip this one and go to the next one.

Approach #2

Another approach is using a HashMap to keep track of elements. This is what I've tried initially but was rejected because I've used HashMap when I wasn't supposed to. The pseudo code would be:

map = new Map // Create map
new_arrray = []

for number in numbers_array
  if not map.contains(number)
  map += number
  new_array += number

print(new_array)

Of course, Since I wrote my implementation of this in Java, I had to make a few modifications to this as you need to first define the size of the array and only then can you add elements to it. So, I've added a count variable to count unique elements and then created a new array after the iteration with that size. This would require two loop iterations, but it is still O(n) which is fine. But Alas I couldn't use this.

And so, then comes my final approach.

Approach #3

The third solution is to first sort the array and then from the sorted array, remove duplicates. We can do this because the problem didn't want us to maintain the given input order. Otherwise, we wouldn't have been able to sort the array.

Sorting is easy enough. We just use the built-in sort method, which will sort the array in place.

Arrays.sort(numbers);

Then comes the major part which is removing the duplicates in that sorted array. We can accomplish that by using two pointers i, j on our array. i goes through the entire loop while j is the slow-moving pointer that only changes based on a condition.

 int j = 0; // Slow moving index

// i is the fast moving index that loops through the entire array
for (int i = 1; i < numbers.length; i++) {
    if (numbers[i] != numbers[j]) {
        j++;
        numbers[j] = numbers[i];
    }
}

The j index is basically playing catch up with i. When there is a duplicate element, i moves ahead while j stays back at the first duplicate element and then with numbers[j] = numbers[i], we assign the next unique value to the j location. After this, our original array has unique elements till index j but after that, we'll have leftover elements. To take care of that, we can create a new array from the numbers array.

int[] result = Arrays.copyOf(numbers, j + 1);
System.out.println(Arrays.toString(result));

And that's it. This will remove all the duplicated elements from the array. To test it, let me run the code:

Input array: [1, -2, 3, 1, 0, 9, 5, 6, 4, 5]
Final result after removing duplicates: [-2, 0, 1, 3, 4, 5, 6, 9]

The sorting of the array can be assumed to be done in O(nlogn). And then the iteration after that is O(n). Put together you still technically get O(n), which is the same as the previous case. Of course depending on a more specific kind of array, the sort might take less time as well. O(n) for the average case is what you finally get.

The full code is present as a gist:

Let me know if you have any more questions that need answers. That is all for this article.


For more programming articles, checkout Freblogg Freblogg/Java


This is the 15th article as part of my twitter challenge #30DaysOfBlogging. Fifteen more articles on various topics, including but not limited to, Java, Git, Vim, Software Development, Python, to come.

If you are interested in this, make sure to follow me on Twitter @durgaswaroop. While you're at it, Go ahead and subscribe here on medium and my other blog as well.


If you are interested in contributing to any open source projects and haven't found the right project or if you were unsure on how to begin, I would like to suggest my own project, Delorean which is a Distributed Version control system, built from scratch in scala. You can contribute not only in the form of code but also with usage documentation and also by identifying any bugs in its functionality.


Thanks for reading. See you again in the next article.


Image of Donuts: http://echmondprojects.com/wp-content/uploads/2016/04/two-arrays-700x525.png

December 29, 2017

Publish Articles To Your Medium Blog In One Second With Integration Tokens

14:27 Posted by Freblogg , , , , 2 comments

In my article My semi automated workflow for blogging, I have talked about my blogging workflow. There were two main things (actually one thing) in that flow that were not automated. i.e., automatically Uploading to Blogger and automatically Uploading to Medium. I have talked about the first one here. This article is about uploading posts to Medium automatically.

Medium Logo 

Developer documentation for Medium is a breath of fresh air after the mess that is Google API’s. Of course, Google API’s are complex because they have so many different services, but they could’ve done a better job at organizing all that stuff. Anyway, Let’s see how you can use Medium API’s.

Setting Up

We don’t really need any specific dependencies for what we’re doing in this article. You can do everything with urllib which is already part of the python standard library. I’ll be using requests as well to make it a bit more simpler but you can achieve the same without it.

Getting the access token

To authenticate yourself with Medium, you need to get an access token that you’ll pass along to every request. There are two ways to get that token.

  1. Browser-based authentication
  2. Self-issues access tokens

Which one you should go with, depends on what kind of application you’re trying to build. As you can probably guess based on the title, we’ll be covering the second method in this article. The first method needs an authentication server setup which can accept callback from Medium. But, since at this moment, I don’t have that setup, I’m going with the second option.

The Self-issued access tokens method is quite easy to work with as you directly take the access token without having to have the user authenticate via the browser.

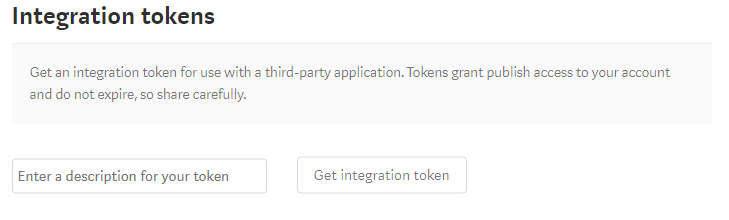
To get the access token, Go to Profile Settings and scroll down till you see Integration tokens section.

Medium Integration tokens 

There enter some description for what you’re going to use this token and click on Get integration token. Copy that generated token which looks something like 181d415f34379af07b2c11d144dfbe35d and save it some where to be used in your program.

Using Access token to access Medium

Once you have the access token, you’ll use that token as your password and send it along with every request to get the required data.

Let’s get started then. As, I’ve said we’ll be using requests library for url connections. We’ll also be using the json libary for parsing the responses. So, Let’s import them.

import requests
import json

Then use access_token you’ve got and put it in a headers dictionary.

access_token = '181d415f34379af07b2c11d144dfbe35d'
headers = {
    'Authorization': "Bearer " + access_token,
    'User-Agent': 'Mozilla/5.0 (Windows NT 6.3; Win64; x64) AppleWebKit/537.36 (KHTML, like Gecko) Chrome/63.0.3239.84 Safari/537.36'
}

The User-Agent in the above dictionary is required as Medium won’t accept your request otherwise. You don’t have to have the same value as I did.

Validating the access token

First thing to check is if the access_token is valid. You can do that by making a GET request to https://api.medium.com/v1/me and checking the response.

me_url = base_url + 'me'
me_req = ureq.Request(me_url, headers=headers)
me_response = ureq.urlopen(me_req).read()
json_me_response = json.loads(me_response)
print(json_me_response)

And, when I print the json_me_response, which is a json object, I get the following:

{
"data": {
  "id":"5303d74c64f66366f00cb9b2a94f3251bf5adskak7623as",
  "username":"durgaswaroop", 
  "name":"Durga swaroop Perla", 
  "url":"https://medium.com/@durgaswaroop",
  "imageUrl":"https://cdn-images-1.medium.com/fit/c/400/400/0*qVDXEHT9DDYUOcrj."
  }
}

If we got that response like above, then we know that the access token we have is valid.

From there, I extract, the user_id from the JSON string, with

user_id = json_me_response['data']['id']

Get User’s Publications

From the above request, we’ve validated that the access token is correct and we also have got the user_id. Using that we can get access to the publications of a user. For that, we’ve to make a GET to https://api.medium.com/v1/users/{{userId}}/publications and you’ll see the list of the publications by that user.

user_url = base_url + 'users/' + user_id
publications_url = user_url + 'publications/'
publications_req = ureq.Request(publications_url, headers=headers)
publications_response = ureq.urlopen(publications_req).read()
print(publications_response)  

I don’t have any publications on my medium account, and so I got an empty array as response. But, if you have some publications, the response will be something like this.

{
  "data": [
    {
      "id": "b969ac62a46b",
      "name": "About Medium",
      "description": "What is this thing and how does it work?",
      "url": "https://medium.com/about",
      "imageUrl": "https://cdn-images-1.medium.com/fit/c/200/200/0*ae1jbP_od0W6EulE.jpeg"
    },
    {
      "id": "b45573563f5a",
      "name": "Developers",
      "description": "Medium’s Developer resources",
      "url": "https://medium.com/developers",
      "imageUrl": "https://cdn-images-1.medium.com/fit/c/200/200/1*ccokMT4VXmDDO1EoQQHkzg@2x.png"
    }
  ]
}

Now, one weird thing about Medium’s API is that they don’t have a GET for posts. From the API’s we can get a list of all the publications but you can’t get a user’s posts. You can only publish a new post. Although, it is odd for that to be missing, It is not something I’m looking for anyway, as I am only interested in publishing an article. But if you need that, you probably should check to see if there are any hacky ways of achieving the same (at your own volition).

Create a New Post

To create a new post, we have to make a POST request to https://api.medium.com/v1/users/{{authorId}}/posts. The authorId here would be the same as the userId of the user whose access-token you have.

I’m using requests library for this as making a POST request becomes easy with it. Of course, first you need to create a payload to be uploaded. The payload should look something like the following, as described here

{
  "title": "Liverpool FC",
  "contentFormat": "html",
  "content": "<h1>Liverpool FC</h1><p>You’ll never walk alone.</p>",
  "tags": ["football", "sport", "Liverpool"],
  "publishStatus": "public"
}

So, for this, I did the following:

posts_url = user_url + 'posts/'

payload = {
    'title': 'Medium Test Post',
    'contentFormat': 'markdown',
    'tags': ['medium', 'test', 'python'],
    'publishStatus': 'draft',
    'content': open('7.Test_post.md').read()
}

response = requests.request('POST', posts_url, data=payload, headers=headers)
print(response.text)

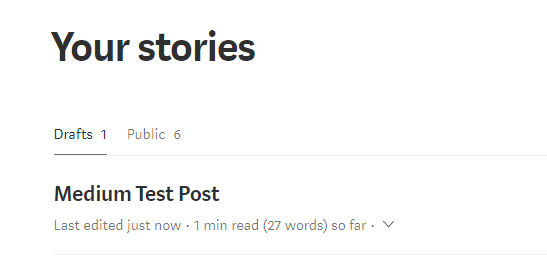
As you see, for contentFormat, I’ve set markdown and for content I read it straight from the file. I didn’t want to publish this as it is just a dummy post and so I’ve set the publishStatus to draft. And sure enough, it works as expected and I can see this draft added on my account.

Draft post 

Do note that the title in the payload object won’t actually be the title of the article. If you want to have a title, you add it in the content itself as a <h*> tag.

The full code is available as a gist.

That is all for this article.


For more programming and Python articles, checkout Freblogg and Freblogg/Python

Some articles on automation:

Web Scraping For Beginners with Python

My semi automated workflow for blogging


This is the seventh article as part of my twitter challenge #30DaysOfBlogging. Twenty-three more articles on various topics including but not limited to Java, Git, Vim, Software Development, Python, to come.

If you are interested in this, make sure to follow me on Twitter @durgaswaroop. While you’re at it, Go ahead and subscribe to this blog and my blog on Medium as well.


If you are interested in contributing to any open source projects and haven’t found the right project or if you were unsure on how to begin, I would like to suggest my own project, Delorean which is a Distributed Version control system, built from scratch in scala. You can contribute not only in the form of code, but also with usage documentation and also by identifying any bugs in the functionality.


Thanks for reading. See you again in the next article.

December 27, 2017

Datasets in Apache Spark | Part 1

In my previous post I have talked about Apache Spark. We have also built an application for counting the number of words in a file, which is the hello world equivalent of the big data world.

Apache spark Java Logo’s

It has been over 18 months since that article and spark has changed quite a lot in this time. A new major release of spark, which is spark-2.0 came out and now the latest version is 2.2.1. And with a new version comes new API’s and improvements. In-fact the first thing you’ll probably notice is that, you don’t need to create SparkContext or JavaSparkContext objects anymore. The various context and configurations have been put together into a new class SparkSession. You can still access the SparkContext or the SqlContext from the SparkSession object itself. So, you’ll be starting your programs with this now:

SparkSession spark = SparkSession.builder().appName("Freblogg-Spark").master("local").getOrCreate();

And you can use this spark variable the way you’d use other context variables.

Another change in Spark 2.0 is that, there is a heavy emphasis on the usage of Dataset API’s, and for a good reason. Datasets are more performant and memory efficient than RDD’s. RDD (Resilient Distributed Datasets) have been pushed to second place now. You can still use RDD’s if you want but Datasets are the preferred API. In fact, datasets have some nice convenience methods that we can use them for even unstructured data like text as well. Let’s generate some cool lipsum from Malevole. It looks something like this:

Ulysses, Ulysses - Soaring through all the galaxies. In search of Earth, flying in to the night. Ulysses, Ulysses - Fighting evil 
and tyranny, with all his power, and with all of his might. Ulysses - no-one else can do the things you do. Ulysses - like a bolt of
thunder from the blue. Ulysses - always fighting all the evil forces bringing peace and justice to all....

Now, you might try to use an RDD to read this, but let’s see what we can do with Datasets.

Dataset<String> lipsumDs = spark.read().textFile("fake-text.txt");
lipsumDs.show(5);

Here we are reading the text file using the spark object we created earlier and that gives us a Dataset<String> lipsumDs. The show() method on the dataset object prints the dataset. And we get the following output:

+--------------------+
|               value|
+--------------------+
|Ulysses, Ulysses ...|
|Ulysses, Ulysses ...|
| no-one else can ...|
|  always fighting...|
|                    |
+--------------------+

What we see here are the lines of the text file. Each line in the file is now a row in the Dataset. There are now a rich set of functions available to you in Datasets which weren’t in RDD’s. You can do filters on the rows for certain words, do a count on the table, perform groupBy operations, etc all like you would on a Database table. For a full list of all the available operations on Dataset, read this: Dataset: Spark Documentation.

I hope that’s enough talk about unstructured data analysis. Let’s get to the main focus of this article, which is using Datasets for structured data. More specifically, csv and json. For this tutorial, I am using the data created from Mockaroo, an online data generator. I’ve created 1000 csv records that look like this:

id,first_name,last_name,email,gender,ip_address
1,Netti,McKirdy,nmckirdy0@slideshare.net,Female,148.3.248.193
2,Nickey,Curreen,ncurreen1@tripadvisor.com,Male,206.9.48.216
3,Allayne,Chatainier,achatainier2@trellian.com,Male,191.118.4.217
4,Tades,Emmett,temmett3@barnesandnoble.com,Male,153.113.87.195
5,Shawn,McGenn,smcgenn4@shop-pro.jp,Male,247.45.80.68
6,Giuseppe,Scobbie,gscobbie5@twitter.com,Male,123.114.131.200
...

We’ll use this data, which I’ve put in a file named fake-people.csv, to work with Datasets. Let’s create a Dataset out of this csv data.

Dataset<Row> peopleDs = spark.read().option("header", "true").csv("fake-people.csv");
peopleDs.show(5);

Since we’ve column headers in our data, we add the .option("header", "true") and the output is a nicely formatted table of the data with all the columns like this:


+---+----------+----------+--------------------+------+--------------+
| id|first_name| last_name|               email|gender|    ip_address|
+---+----------+----------+--------------------+------+--------------+
|  1|     Netti|   McKirdy|nmckirdy0@slidesh...|Female| 148.3.248.193|
|  2|    Nickey|   Curreen|ncurreen1@tripadv...|  Male|  206.9.48.216|
|  3|   Allayne|Chatainier|achatainier2@trel...|  Male| 191.118.4.217|
|  4|     Tades|    Emmett|temmett3@barnesan...|  Male|153.113.87.195|
|  5|     Shawn|    McGenn|smcgenn4@shop-pro.jp|  Male|  247.45.80.68|
+---+----------+----------+--------------------+------+--------------+

You can read in json data similarly as well. So, I generated some json this time from mockaroo.

{"id":1,"first_name":"Zenia","last_name":"Joberne","email":"zjoberne0@foxnews.com","gender":"Female","ip_address":"214.207.159.43"}
{"id":2,"first_name":"Renard","last_name":"Kezor","email":"rkezor1@elpais.com","gender":"Male","ip_address":"199.3.18.104"}
{"id":3,"first_name":"Briant","last_name":"Patel","email":"bpatel2@odnoklassniki.ru","gender":"Male","ip_address":"111.184.217.23"}
{"id":4,"first_name":"Robinett","last_name":"Heasley","email":"rheasley3@tiny.cc","gender":"Female","ip_address":"21.40.190.226"}
{"id":5,"first_name":"Rosalinda","last_name":"Glandfield","email":"rglandfield4@indiegogo.com","gender":"Female","ip_address":"26.16.4.132"}
{"id":6,"first_name":"Haslett","last_name":"Culligan","email":"hculligan5@meetup.com","gender":"Male","ip_address":"201.191.72.10"}
....

Note: Spark can read json only of this format where we have one object per row. Otherwise you will see _corrupt_record when you print your dataset. That’s your cue to make sure the json is formatted as per spark’s need.

And you read json very similar to the way you read csv. Since in json we don’t have headers, we don’t need the header option.

Dataset<Row> peopleJsonDs = spark.read().json("fake-people.json");
peopleJsonDs.show(5);

And the output is,

+--------------------+----------+------+---+--------------+---------+
|               email|first_name|gender| id|    ip_address|last_name|
+--------------------+----------+------+---+--------------+---------+
|psurgison0@istock...|   Prissie|Female|  1| 48.151.89.171| Surgison|
| rsewell1@jalbum.net|    Robena|Female|  2| 184.16.37.210|   Sewell|
|aluxon2@list-mana...| Annamarie|Female|  3| 254.69.187.23|    Luxon|
|sodoherty3@twitpi...|   Shannah|Female|  4| 0.245.101.197|O'Doherty|
| alodford4@jigsy.com|     Alice|Female|  5|70.217.170.182|  Lodford|
+--------------------+----------+------+---+--------------+---------+

You can see the order of columns is jumbled. This is because JSON data doesn’t usually keep any specified order and so, when you read JSON data into a dataset, the order might not be same as what you’ve given. Of course if you want to display the columns in a particular order, you can always do a select operation.

peopleJsonDs.select("id", "first_name", "last_name", "email", "gender", "ip_address").show(5);

And that would print it in the right order. This is exactly like the SELECT query in SQL, if you’re familiar with it.

Now, that we have seen how to create Datasets, let’s see some of the operations we can perform on them.

Operations on Datasets

Datasets are built on top of Dataframes. So, if you’re already familiar with Dataframes in the spark 1.x releases you already know a ton about Datasets. Some of the operations you can perform on Dataset are as follows:

Column selection

Select one or more columns from the dataset.
peopleDs.select("email").show(5); // Selecting one column
peopleDs.select(col("email"), col("gender")).show(5); // Selecting multiple columns

Note: col is a static import of org.apache.spark.sql.functions.col;

Filtering on columns

Filter a subset of rows in the dataset based on conditions.
// Filter rows with id > 5 and \<= 10
peopleDs.filter(col("id").$less$eq(10).and(col("id").$greater(5))).show();

Dropping columns

Remove one or more columns from the dataset
peopleDs.drop("last_name", "ip_address").show(5);

Sorting on columns

peopleDs.sort(desc("first_name")).show(5);

And that sorts the dataset in the reverse order of the column first_name.

Output:

+---+----------+---------+--------------------+------+-------------+
| id|first_name|last_name|               email|gender|   ip_address|
+---+----------+---------+--------------------+------+-------------+
|685|  Zedekiah|  Brockie|zbrockiej0@mozill...|  Male|105.119.18.98|
|308|     Zarla| Bryceson|zbryceson8j@redif...|Female|55.118.168.15|
|636|  Zacherie|   Kermon|zkermonhn@prnewsw...|  Male| 120.36.10.87|

Those are some of the functions that you can use with Datasets. There are still several Database table type operations on Datasets, like group By, aggregations, joins, etc. We’ll look at them in the next article on Spark as I think this article already has a lot of information already and I don’t want to overload you with information.

So, that is all for this article. If you’re someone that has never tried Datasets or Dataframes, I hope this article gave a good introduction on the topic to keep you interested in learning more.

The full code is available as gist.


For more Java, Apache Spark, Big data and other programming articles, checkout Freblogg, Freblogg/Java, Freblogg/Spark


This is the fifth article as part of my twitter challenge #30DaysOfBlogging. Twenty-five more articles on various topics including but not limited to Java, Git, Vim, Software Development, Python, to come.

If you are interested in this, make sure to follow me on Twitter @durgaswaroop. While you’re at it, Go ahead and subscribe to this blog and my blog on Medium as well.


If you are interested in contributing to any open source projects and haven’t found the right project or if you were unsure on how to begin, I would like to suggest my own project, Delorean which is a Distributed Version control system, built from scratch in scala. You can contribute not only in the form of code, but also with usage documentation and also by identifying any bugs in the functionality.


Thanks for reading. See you again in the next article.

December 25, 2017

Tweeting with Python and Tweepy

13:30 Posted by Freblogg , , , , , , , No comments

Programmers love to automate things and I'm no exception. I always like automate my common tasks. Whether it is checking for stock prices or checking to see when the next episode of my favorite show is coming, I've automated scripts for that. Today I am going to add one more thing in that list i.e., automated tweeting. I tweet quite frequently and I would love to have a way of automating this as well. And that's exactly what we're going to do today. We are tweeting using python.

twitter and python

We'll use a python library called tweepy for this. Tweepy is a simple, easy to use library for accessing Twitter API.

Accessing twitter API's programmatically is not only just an accessibility feature but can be of enormous value too. Mining the twitter verse data is one of the key steps in sentimental analysis. Twitter chat bots have also become quite popular now a days with hundreds and thousands of bot accounts. This article, although, only barely scratches the surface, hopefully will helping in building yourself towards that.

Setting Up

First thing's first, install tweepy by running pip install tweepy. The latest version at the time of the writing this article is 3.5.0.

Then we need to have our Twitter API credentials. Go to Twitter Apps. If you don't have any apps registered already, go ahead and click the Create New App button.

To register your app you have to provide the following three things

  1. Name of your application
  2. Description
  3. Your website url

There is one more option which is callback URL. You can ignore that for now. Then after reading the Twitter developer agreement (wink wink), click on Create your Twitter application button to create a new app.

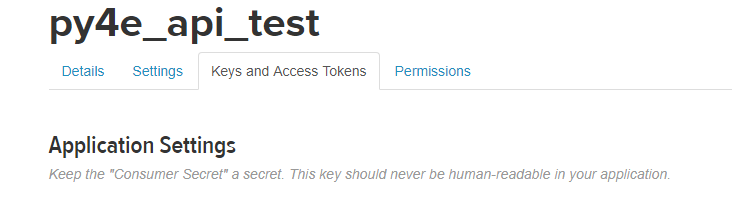
Once the app is created you should see that in your twitter apps page. Click on it and GOTO the Keys and Access Tokens tab.

twitter apps tabs

There you will see four pieces of information. First you have your app API keys which are consumer key and consumer secret. Then you have your access token and access token secret.

We'll need all of them to access twitter API's. So, have them ready. I have copied all of them and exported them as system variables. You could do the same or if you'd like, you can read them from a file as well.

Let's get started

First you have to import tweepy and os(only if you are accessing system variables).

import tweepy
import os

Then I'll populate the access variables by reading them environment variables.

consumer_key = os.environ["t_consumer_key"]
consumer_secret = os.environ["t_consumer_secret"]
access_token = os.environ["t_access_token"]
access_token_secret = os.environ["t_access_token_secret"]

With the keys ready, we setup the authorization.

authorization = tweepy.OAuthHandler(consumer_key, consumer_secret)
authorization.set_access_token(access_token, access_token_secret)

After authorization we create an API object twitter

twitter = tweepy.API(authorization)

And now you can tweet from python using this twitter object like this.

twitter.update_status("Tweet using #tweepy")

That is all you have to do. Just five lines of code and you can already tweet. You should try it out and check your twitter account. I just ran this command and this is the tweet.

Not just this, you can also tweet media. Let's tweet again, this time with a picture attached.

image = os.environ['USERPROFILE'] + "\\Pictures\\cubes.jpg"
twitter.update_with_media(image, "Tweet with media using #tweepy")

And this is the media tweet.

When you run the previous commands, you'll see that there is a lot of output that is printed on the terminal. This is a status object with a lot of useful data like the number of followers you got, your profile picture URL, your location etc., pretty much everything you get from your twitter page. We can make use of this information, If we are building something more comprehensive.

Apart from sending regular tweets, you can also reply to existing tweets. To reply to a tweet you'd first need its tweet_id which you can get from the tweet's URL.

For example the URL for previous tweet is https://twitter.com/durgaswaroop/status/945049796238118912 and the tweet_id is 945049796238118912.

Using that id, we can send another tweet as reply.

id_of_tweet_to_reply = "945049796238118912"
twitter.update_status("Reply to a tweet using #tweepy", in_reply_to_status_id=id_of_tweet_to_reply)

The only change in the syntax is in_reply_to_status_id=id_of_tweet_to_reply that is passed as the second argument. And with that our new tweet will be added as reply to the original tweet.

The new reply tweet is this:

That's how easy it is to access Twitter API with tweepy. We now know how to tweet and how to reply to a tweet. Building up from this knowledge, In a later tutorial, I can show you how to create your own twitter chat-bot and also twitter streaming analysis.

The full code of things covered in this article is available as gist at


For more programming and Python articles, checkout Freblogg and Freblogg/Python

Web Scraping For Beginner with Python


This is the third article as part of my twitter challenge #30DaysOfBlogging. Twenty-seven more articles on various topics including but not limited to Java, Git, Vim, Software Development, Python, to come.

If you are interested in this, make sure to follow me on Twitter @durgaswaroop. While you're at it, Go ahead and subscribe to this blog and my blog on Medium as well.


If you are interested in contributing to any open source projects and haven't found the right project or if you were unsure on how to begin, I would like to suggest my own project, Delorean which is a Distributed Version control system, built from scratch in scala. You can contribute not only in the form of code, but also with usage documentation and also by identifying any bugs in the functionality.


Thanks for reading. See you again in the next article.

September 11, 2017

How to recover from 'git reset --hard" | Git

12:30 Posted by Freblogg , , No comments
Git is an amazingly powerful tool. But, as Uncle Ben said,
With great power, comes great responsibility
And that is true for Git as well. If you are not careful when using it, you could easily burn your a**.
So, If something like that happened to you, Or If you want to make sure that never happens to you, then watch this video.


Subscribe to the channel for more videos like this.

August 26, 2017

December 20, 2016

Understanding Git Octopus Merge

The Code for Git merge is one of the most sophisticated pieces of software ever written. There is so much stuff that goes inside during a merge that its just mind boggling. Just for that alone, Linus could be considered a programming genius. Too bad for other geniuses, he has Linux kernel on his resume :-D.

Git Logo

As the title suggests this article is about Octopus Merge in Git. For this I hope you know what a basic Git merge is and what it means to merge. If you're completely unfamiliar with Git, then I've no idea what you're doing here. You better read up on some Git 101 before jumping to this article.

Anyway, Just to brush up, this is how a simple/familiar Git merge goes ..

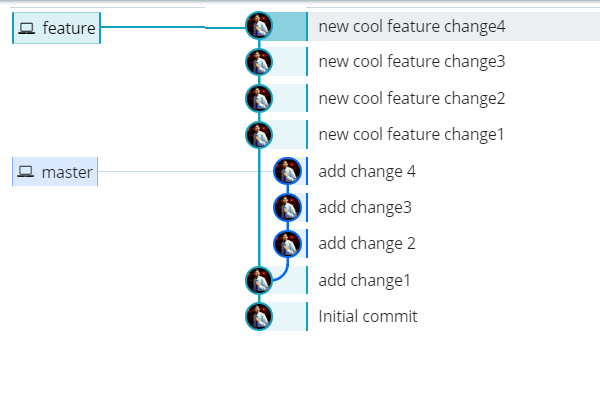
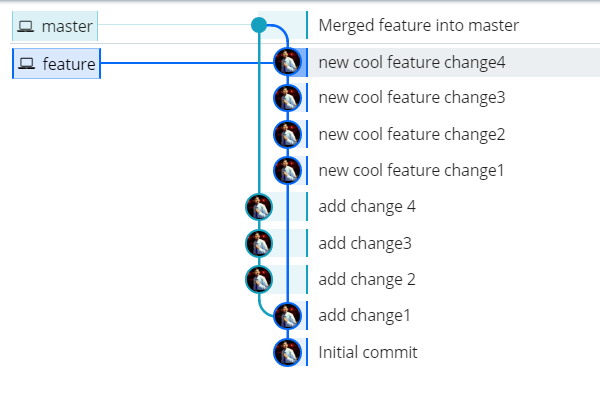
We have a branch called feature that diverged from master at the second commit and went to have two commits of its own.

Master and Feature branches in Git

Note: For the branch pictures in this article I am using a Git GUI tool called Git Kraken. I have been trying it a few days now and it looks quite promising. I am a fan of its clean and minimalist UI and have been using it extensively for the beautiful visualization of branches. And above all, It is free for personal non-commercial use. So, you can try it out for free.

Now you want to add those cool new changes on the feature branch to master. The way you do it is by merging (Let's not talk about Rebasing for now. We will look at it another time). So, when you merge this is how it looks like.

Git merge master feature

This is all the usual stuff that we are all familiar with.

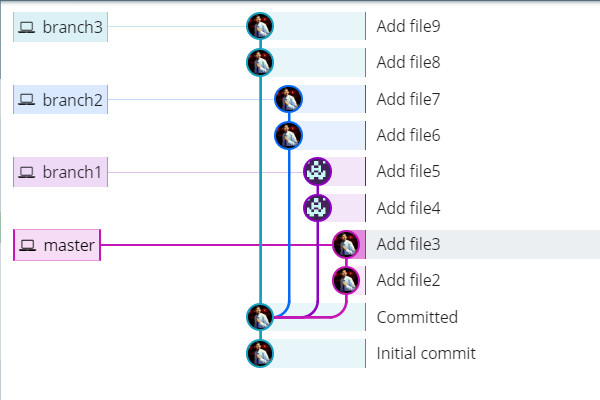
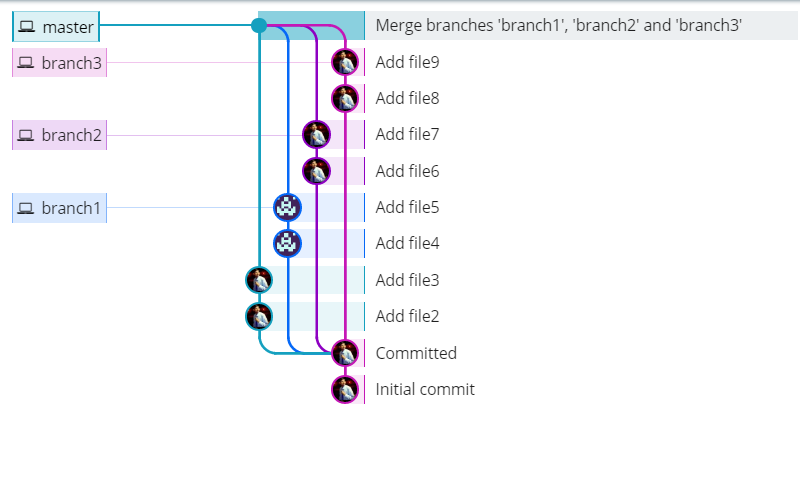
Now there is another type of merge called the The Octopus Merge. At least some of you must have heard about it either from an online video or from a colleague in your office that seems to know everything. Either way the Octopus merge is a really fun way of Merging. You probably won't get to do this at your work as a lot of companies think this complicates things and we all know how much Companies hate complexity. Anyway, Let's see what it looks like. I have a local git repository with three branches branch1, branch2, branch3 along with master. All four of these branches have two extra commits from the point they diverged.

Git octopus pre image

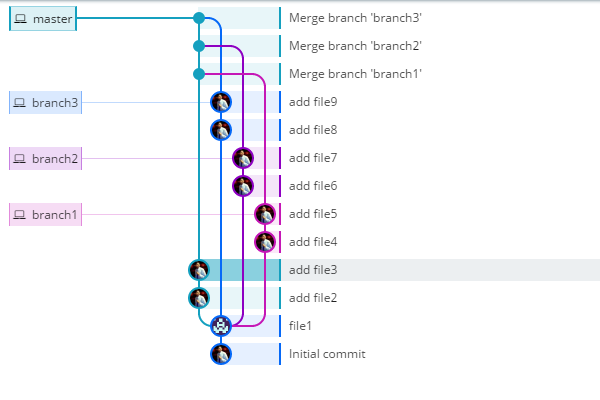
Now if you want to merge them, the usual way would be to merge two branches at a time to finally get to the final combination after three merges like so.

The usual way to merge branches in Git

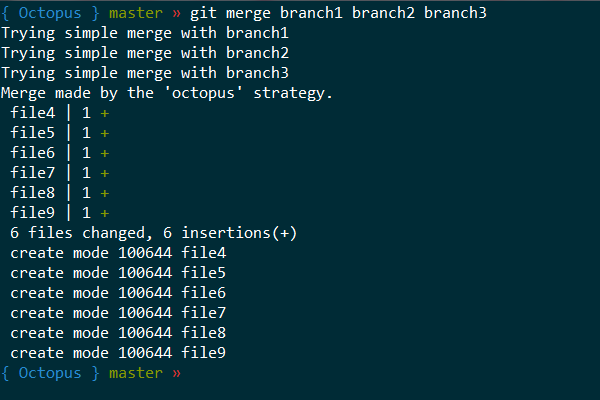
This may seem fine and might actually be the only way you would think about this if not for the Octopus merge. You have three merge commits here and as we know merge commits are noise. They pollute the history of your repository and interrupt the story told by your Git history. So, how about keeping the noise low by just having one Merge commit instead of three. How you ask? Octopus, My friend. All hail the great and mighty Octopus. So, the way you perform an Octopus is by merging all the branches at once on to the master. To do that you give a command like this

Git merge octopus

This will merge all the three branches to master. The branches will look something like this. Do you see the reference of Octopus now?

Octopus Git merge

Now, if you know anything about octopuses, you might be wondering that we only have four legs here while an Octopus has 8. Well you are right. Octopuses do have 8 legs (technically 6 as two of them are used as hands) but 4 is good enough. Actually any merge can be called Octopus if you're merging three or more branches.

If you are using Git for sometime, you might be wondering, If Octopus is so freaking cool, why haven't more people heard about it and Why are more people not using it. Well, you are right my friend. Octopus is awesome for sure, but as I said it certainly does complicate things a lot especially when dealing with merge conflicts. Merge is hard enough as it is when dealing with just two branches. But if you are merging 5 or 10 branches together it feels like you're doing a complex surgery. You have to be really careful in that case and I am not even sure if any modern GUI tools support diffing 10-way. Also a lot of people tend to go overboard with Octopus.

Look at this message where Linus Torvalds yells (pleasantly) at a guy for creating an Octopus with 66 branches. Imagine that for a second. 66 branches! I wouldn't want to be the guy that handles merge conflicts on that one! Linux aptly says

that's not an octopus, that's a Cthulhu merge

Cthulu Image

So, a lot of companies don't really use this. A lot of people won't even consider this for their Merge strategies.

A rule of thumb to follow with Octopus is to never overdo it. An 8-way octopus merge though borders on crazy hard and insane, is fine but more than that is an overkill. The situations where you have to merge more than 5 or 6 branches tend to be very rare and in those cases may be you can go for an Octopus on a subset of branches at a time and do a Octopus for those. Or may be rethink your merging strategy.

Either way, I hope this article helped you in understanding something new and gives you some ideas for dealing with complex merges. I hope you will educate your peers and colleagues about this new merge and share this article with them

Well, That is all for this article folks. See you again in the next one. Until then, Good Bye.


For more interesting articles,

Subscribe to Freblogg's RSS feed. Its a great way to get all the new articles directly.

Follow FreBlogg on Facebook and follow @durgaswaroop on Twitter

Special Thanks to Git Kraken team at Axosoft for developing a great tool like Kraken.

Attributions:

Cthulhu Image : https://commons.wikimedia.org/wiki/File:Cthulhu_and_R'lyeh.jpg

June 23, 2016

Word Count application with Apache Spark and Java

02:00 Posted by Freblogg , , , , , 1 comment
Apache Spark is becoming ubiquitous by day and has been dubbed the next big thing in the Big Data world. Spark has been replacing MapReduce with its speed and scalability. In this Spark series we will try to solve various problems using Spark and Java.
spark-java-freblogg
Word count program is the big data equivalent of the classic Hello world program. The aim of this program is to scan a text file and display the number of times a word has occurred in that particular file. And for this word count application we will be using Apache spark 1.6 with Java 8.

June 18, 2016

Switch Case With Strings | Java

22:21 Posted by Freblogg , , , No comments
Switch Case is certainly one of the most widely used programming constructs. It is just as widely used in Java as in any other language.java-logo
Up until Java 7, switch in Java did not support String type in the case statement. So, if you want to perform multiple comparisons on Strings, the only way you were able to do it was by using multiple If - Else Statements which is certainly not pretty!
But, then in Java 7 they have introduced Switch With Strings and it was welcomed by everyone who had to write those terrible if-else ladders. So, Let’s see how we can use Strings in a Case statement.

How to Open Vlc using Java

22:07 Posted by Freblogg , , , No comments
Java is a very versatile programming language and so needless to say you can do a lot of things with it. Even if it is playing a video or audio using VLC!

So, what do you need to do this?
  • You obviously need Java installed on your system
  • You need VLC. Duh!!  (You can use just about any other player if you wish)
  • (Optional) Source code for this program from github
So, With that said, let's get started.